Published - Wed, 20 Dec 2023

lights in Unreal Engine

lights in Unreal Engine

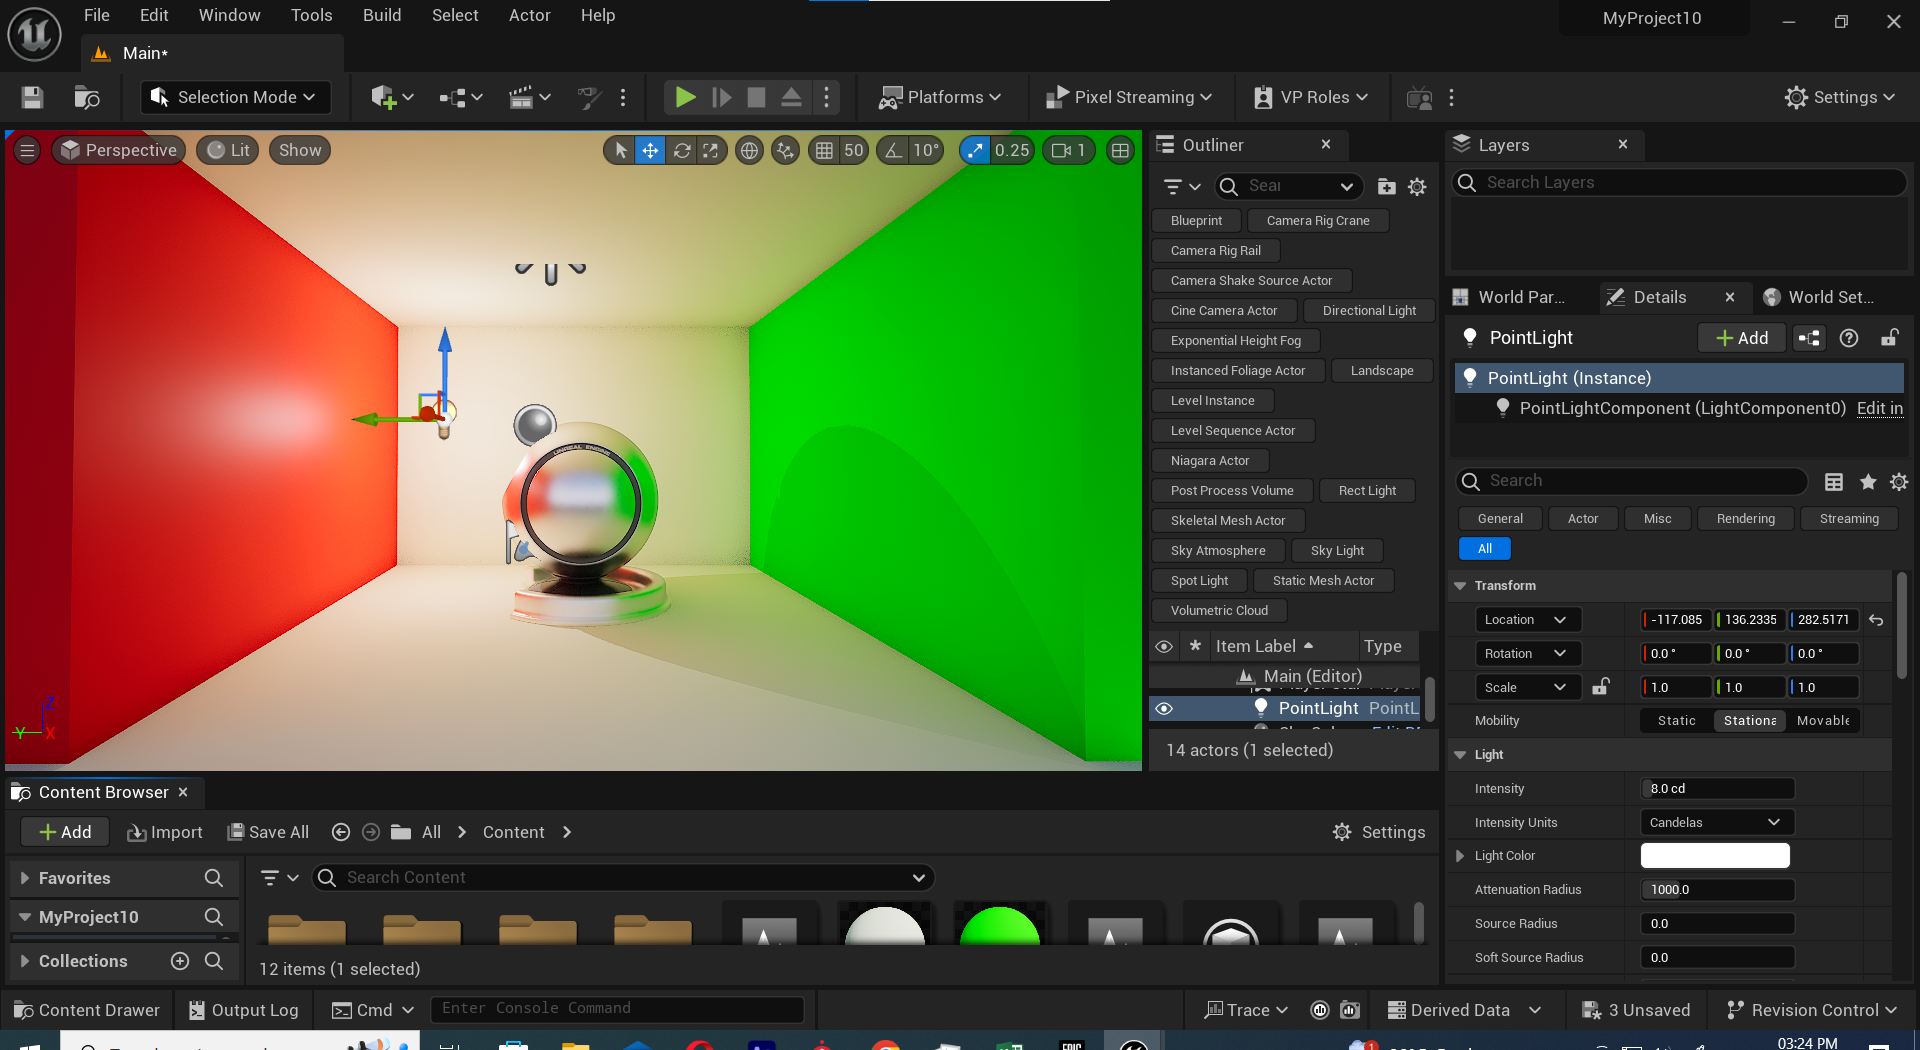
an overview of lights in Unreal Engine. Unreal Engine is a popular game development engine, and it offers a sophisticated lighting system to create realistic and immersive visuals in games and other virtual experiences. Here are some key aspects of lights in Unreal Engine:


1. **Types of Lights:**

   - **Point Light:** A light source that emits light in all directions from a single point in 3D space.

   - **Spotlight:** A directional light with a cone-shaped emission, simulating a focused light beam.

   - **Directional Light:** A light source that emits parallel light rays in a specific direction, often used to simulate sunlight.


2. **Properties and Settings:**

   - **Intensity:** Controls the brightness of the light.

   - **Color:** Determines the color of the light emitted.

   - **Attenuation:** Defines how the light diminishes with distance.

   - **Radius/Length:** Specifies the reach or size of the light source.

   - **Cone Angle/Exponent (Spotlight):** Defines the cone angle and falloff for spotlight.


3. **Lighting Effects:**

   - **Dynamic Shadows:** Unreal Engine supports dynamic shadow casting from lights, providing realistic shadow effects that change in real-time based on the position of the light source and the objects in the scene.

   - **Light Functions:** These are textures that can be used to modulate the light's color and intensity, allowing for advanced effects like animated lights or complex patterns.


4. **Global Illumination and Reflections:**

   - Unreal Engine also supports advanced features like Global Illumination (GI) and Reflections. GI simulates indirect lighting, making scenes more realistic, while reflections create accurate reflections of objects in shiny surfaces.


5. **Lighting Scenarios:**

   - Unreal Engine allows developers to set up different lighting scenarios for various times of day or environmental conditions. This can be achieved through dynamic day-night cycles or manual adjustments.


6. **Lighting Quality:**

   - Unreal Engine provides scalable settings for lighting quality, allowing developers to balance visual fidelity with performance based on the target platform.


7. **Lighting in Sequencer:**

   - Unreal Engine's Sequencer tool allows for cinematic storytelling, and it includes features for controlling lights in animated sequences.


Understanding and effectively using lights in Unreal Engine is crucial for achieving visually stunning and immersive environments in games or other interactive experiences. Developers often spend considerable time fine-tuning lighting to achieve the desired atmosphere and realism in their projects.

Created by

Anil Chauhan

Welcome to my website! My name is Anil Chauhan, and I am a 3D modeling and animation expert with over 15 years of experience in the field. I have a passion for creating visually stunning 3D models, animations, and graphics, and I'm excited to share my expertise with you. Whether you're a beginner or an experienced artist, I can help you improve your skills in 3D modeling, texturing, lighting, animation, rigging, CG graphics, and VFX. Let's work together to bring your creative ideas to life!

Welcome to my website! My name is Anil Chauhan, and I am a 3D modeling and animation expert with over 15 years of experience in the field. I have always had a passion for creating visually stunning 3D models, animations, and graphics, and my work has been featured in a variety of industries including film, television, advertising, and video games.


Throughout my career, I have had the opportunity to work on a wide range of projects, from small independent films to large-scale productions. This has given me a diverse set of skills and a deep understanding of the 3D animation process from start to finish. I have expertise in complete 3D modeling, texturing, lighting, animation, rigging, CG graphics, and VFX, and I'm always eager to take on new and exciting challenges.


As a tutor, I am dedicated to sharing my knowledge and experience with aspiring artists and professionals alike. I believe that everyone has the potential to create amazing 3D models and animations, and I'm committed to helping my students achieve their goals. Whether you're a beginner looking to get started in the world of 3D animation, or an experienced artist looking to take your skills to the next level, I can provide personalized training and guidance to help you achieve your creative vision.

View profile

Comments (0)

Search
Popular categories
Latest blogs
Lighting Effects and adjustments
Lighting Effects and adjustments1. Light Grouping and effects2. Light Adjustments3. Determining the Light's area of Illumination4. Light Linking5. Light SelectionHere's an overview of Lighting Effects and Adjustments in Maya:1. Light Grouping and Effects Group multiple lights to control them collectively. Use light sets for easy manipulation of specific scene lighting. Apply different light effects like intensity variation, color blending, and shadow control. 2. Light Adjustments Modify intensity, color, and exposure for realistic lighting. Adjust decay rate to mimic natural light falloff. Fine-tune specular and diffuse contributions for better material interaction. 3. Determining the Light's Area of Illumination Use light falloff settings to define how far a light source affects objects. Enable light decay (None, Linear, Quadratic, or Cubic) to simulate realistic illumination. Utilize barn doors or gobos to shape light projections. 4. Light Linking Control which objects a light affects using Light Linking Editor. Exclude or include specific objects for better artistic and technical control. Optimize performance by preventing unnecessary lighting calculations. 5. Light Selection Easily select lights using Outliner or Light Editor. Use Viewport Filters to isolate and adjust selected lights. Select light shape nodes for direct attribute modifications. Would you like a more detailed breakdown on any of these topics?

4 Days Ago

Techniques of Lighting in maya
Techniques of Lighting in maya 1. Set up a direct light source 2. Shadows 3. Lighting Nodes 4. Troubleshoot LightingLighting in Autodesk Maya plays a crucial role in defining the mood, depth, and realism of a scene. Here’s a breakdown of the techniques you listed:1. Set Up a Direct Light Source Types of Lights in Maya: Directional Light: Mimics sunlight, casting parallel rays. Point Light: Emits light equally in all directions (like a bulb). Spotlight: Projects a focused beam with falloff, useful for highlights. Area Light: Soft, natural-looking light from a surface (good for interiors). Volume Light: Light that emits from a specific shape (cube, sphere, etc.). Adjusting Intensity & Color: Modify in the Attribute Editor to match the desired scene ambiance. Three-Point Lighting Setup (common for character lighting): Key Light: Main light source. Fill Light: Softens shadows. Rim Light: Adds a highlight along the edges. 2. Shadows Ray Traced Shadows (sharp, physically accurate, more render-intensive). Depth Map Shadows (softer, faster, but sometimes less accurate). Shadow Parameters: Adjust shadow resolution, filter size, and bias to avoid artifacts. Light Linking: Control which objects cast or receive shadows. 3. Lighting Nodes Arnold Lights (preferred for realistic rendering): aiAreaLight (soft shadows, good for realistic illumination). aiSkyDomeLight (HDRI-based environment lighting). aiMeshLight (turn any object into a light source). Maya’s Default Lights (basic but useful for quick setups). Light Falloff: Controls how light intensity diminishes over distance. 4. Troubleshoot Lighting Black Render Issues? Check if: No light is present (Maya defaults to no lights in Arnold). Light intensity is too low. The camera has “Exposure” settings enabled (especially with Arnold). Noise in Shadows? Increase shadow samples or use denoising in Arnold. Light Not Affecting Objects? Ensure proper light linking. Overexposure? Reduce intensity or use exposure controls in the Render View. Would you like a more detailed guide on a specific lighting scenario, like interior lighting or product rendering? ????

6 Days Ago

Nuke Roto (Rotoscoping in Nuke)
Nuke Roto (Rotoscoping in Nuke)Rotoscoping in Nuke is done using the Roto and RotoPaint nodes to create masks (mattes) for compositing and visual effects.1. Adding a Roto Node Select your footage and press Tab → Roto to create a Roto node. Connect it to your source footage. Use the Bezier or B-Spline tools to draw masks around the subject. 2. Adjusting & Animating Shapes Enable Motion Blur for smooth edges. Use Feathering to soften the mask. Keyframe the shape by adjusting points over time (auto-key enabled). 3. Using RotoPaint for Advanced Rotoscoping Add a RotoPaint node for painting and fine-tuning details. Use Clone, Blur, and Smudge tools to refine edges. 4. Tracking & Stabilizing Roto Use Tracker or Planar Tracker to attach roto shapes to moving objects. Parent Roto shapes to the tracker for stable motion. 5. Exporting Roto as an Alpha or Matte Connect the Roto node to a Premult node for alpha integration. Export using Write Node (Choose EXR or PNG sequence with alpha). Would you like specific details on any part? ????Tags: Nuke Roto, rotoscoping in Nuke, Nuke RotoPaint, Nuke masking, Nuke alpha matte, motion blur in Nuke, feathering roto, planar tracking Nuke, Nuke compositing, export roto in Nuke

6 Days Ago

All blogs