Published - Fri, 27 Dec 2024

Retopology

Retopology

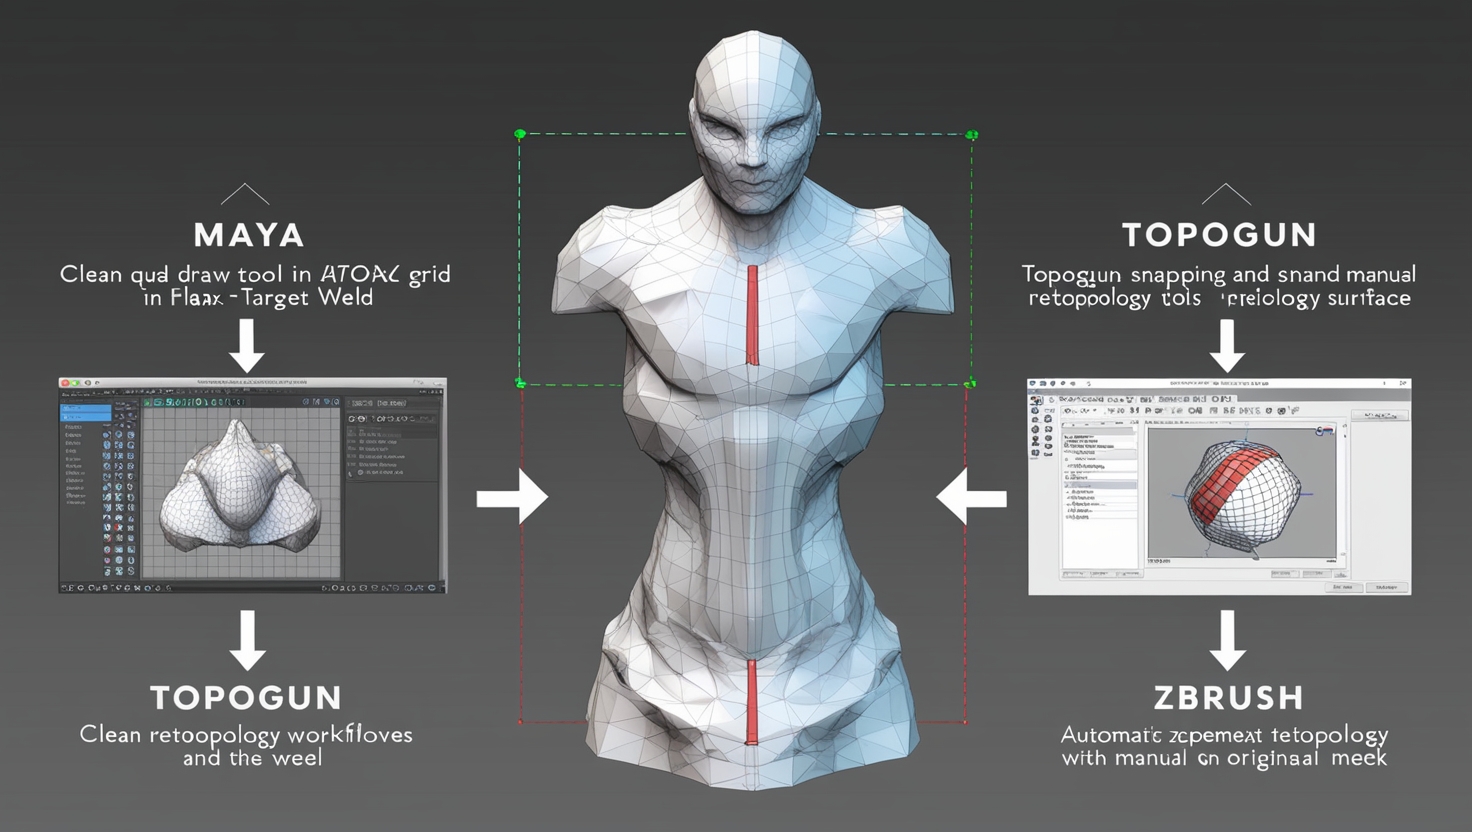
Retopology is an essential process in 3D modeling, often used to create a clean, optimized, and animation-friendly mesh from high-resolution or scanned models. Here’s an overview of how to perform retopology in Maya, Topogun, and ZBrush:


Retopology in Maya

Maya offers robust retopology tools, especially with its Quad Draw feature in the Modeling Toolkit.

  1. Preparation:

    • Import your high-poly model into Maya.
    • Make it "Live" by selecting it and enabling the "Make Live" option in the Modeling Toolkit. This allows snapping directly onto the surface.
  2. Using Quad Draw:

    • Open the Modeling Toolkit (accessible via the Tools shelf or the main menu).
    • Activate Quad Draw.
    • Place points on the live surface to define the vertices of your new topology.
    • Hold Shift to preview quads and click to create them.
    • Use tools like Relax and Target Weld for refinement.
  3. Auto-Retopology:

    • Maya has an Auto-Retopology tool under the Mesh menu, which can create a base mesh automatically. However, manual cleanup is often needed.
  4. Finalize:

    • Unmake the high-poly model live.
    • Adjust and refine the new topology as needed.

    https://www.youtube.com/watch?v=M-RgWYJSgUw

      https://www.youtube.com/watch?v=r95mDSde0S0

      https://www.youtube.com/watch?v=uItW3dbh4Sk

      https://www.youtube.com/watch?v=W8LPj2-OANc

      https://www.youtube.com/watch?v=HvONtyuOfsI

      https://www.youtube.com/watch?v=mZI4yOJpGTA


      https://www.youtube.com/watch?v=vAFiu_Gxyq0


      Retopology in TopoGun

      TopoGun is a specialized software focused entirely on retopology.

      https://www.youtube.com/watch?v=po1bIfDpux0

      1. Setup:

        • Import your high-poly mesh into TopoGun as a reference.
        • Adjust the viewport and visibility settings for clarity.
      2. Creating Topology:

        • Use tools like Draw to manually create new quads by placing points.
        • Extrude allows you to extend edges and create strips of quads.
        • Relax smooths out irregularities in the topology.
      3. Snapping and Symmetry:

        • Enable snapping to keep the new mesh tightly adhering to the high-poly surface.
        • Use symmetry options to work on symmetrical models efficiently.
      4. Export:

        • Once the retopology is complete, export the new mesh for further refinement or UV mapping.

        https://www.youtube.com/watch?v=qKTnRgxu7xw


        Retopology in ZBrush

        ZBrush offers both manual and automatic retopology tools.

        1. Automatic Retopology with ZRemesher:

          • Use ZRemesher under the Geometry menu to quickly create a lower-resolution topology.
          • Adjust settings like Target Polygon Count and Adaptive Size to control the output.
          • Add Guides using curves to direct the topology flow.
        2. Manual Retopology with ZSphere:

          • Create a ZSphere and set it as the retopology tool under Rigging > Select Mesh.
          • Enable Topology in the ZSphere menu and begin placing points manually.
          • Connect points to form quads over the high-poly mesh.
        3. Projection:

          • Use the Project All feature under the SubTool menu to transfer details from the high-poly model to the new topology.
        4. Export:

          • Export the new low-poly mesh for further processing or UV unwrapping.

          https://www.youtube.com/watch?v=DYItcbzvQFU&t=626s


          https://www.youtube.com/watch?v=XWwcG886Pso

          In ZBrush, Decimation Master is a powerful plugin used to reduce the polygon count of a 3D model while maintaining its visual details and shape. This tool is particularly useful when you need to create lower-poly versions of models for purposes such as:

          • Exporting models to game engines (which often require models with lower polygon counts).
          • Creating assets for 3D printing.
          • Reducing the complexity of models for more efficient handling in ZBrush or other programs.

          Here are key features and how Decimation Master works:

          1. Preserves Detail:

          • Decimation Master intelligently analyzes your model and preserves the high-detail areas, such as intricate surface details (like wrinkles, pores, and fine textures).
          • The tool works by simplifying the geometry, reducing polygons without significant loss of detail, unlike traditional methods like retopology, which involve manually creating new topology.

          2. Decimation Process:

          • The process starts with analyzing the model to determine areas of higher and lower detail.
          • It then reduces the polygon count by simplifying the model’s geometry in the low-detail areas, while preserving high-detail regions. This ensures that your model retains its visual fidelity after decimation.

          3. Adaptive Decimation:

          • One of the key features is the adaptive decimation, which means the tool reduces polygons in less important areas of the model (like flat surfaces or parts that won't be seen as closely) while retaining more polygons in areas that require detail (like facial features, hands, or complex textures).
          • The result is a significantly reduced polygon count while maintaining the visual quality of the original high-poly model.

          4. Customizable Settings:

          • Target Polygon Count: You can specify a target polygon count, and Decimation Master will adjust the reduction accordingly.
          • Preserve Details: You can control how much detail should be preserved, based on the model's characteristics.

          5. Fast and Efficient:

          • The plugin is optimized for speed, making it suitable even for large and complex models.
          • It can be applied to entire models, or specific parts of models, allowing for granular control over which areas get decimated and which stay intact.

          6. Use Cases:

          • Game Assets: When creating 3D models for video games, reducing polygon count is essential for performance. Decimation Master helps artists keep high detail in critical areas while ensuring the overall model is lightweight.
          • 3D Printing: For 3D printing, high-poly models often need to be simplified to reduce file size or ensure the model fits within certain print volume constraints. Decimation Master helps by reducing the polygon count without losing the intended appearance.
          • Asset Optimization: It's also used in VFX and animation, where having optimized models can streamline rendering or make animation more efficient.

          How to Use Decimation Master:

          1. Enable the Plugin: Make sure Decimation Master is enabled in your ZBrush installation (it typically comes bundled with ZBrush).
          2. Select Your Model: Open your high-poly model in ZBrush.
          3. Use the Decimation Master Panel: Navigate to the Zplugin menu, and then to Decimation Master.
          4. Pre-process the model: Click the Pre-process Current button. This analyzes the model to determine how best to reduce the polygon count.
          5. Set Desired Poly Count: Use the Decimate button after adjusting the settings to specify how much reduction you want (in percentage or polygon count).
          6. Export: After decimation, you can export the model for use in other programs or engines.

          Conclusion:

          Decimation Master is a crucial tool for artists and developers working with complex, high-poly models in ZBrush. It allows them to quickly and effectively reduce polygon counts while maintaining critical visual details, making the model more suitable for real-time applications, 3D printing, or further processing.

          https://www.youtube.com/watch?v=YvWhou09BEw


          Tips for Effective Retopology:

          • Edge Flow: Ensure good edge flow around deforming areas like joints for animation.
          • Density: Keep polygon density uniform, except for areas needing extra detail.
          • References: Use symmetry and snapping tools to adhere to the high-poly surface.
          • Testing: Import the retopologized mesh into animation or rigging software to test its usability.

          Each software has unique strengths, and your choice depends on your workflow needs and project requirements.

          Created by

          Anil Chauhan

          Welcome to my website! My name is Anil Chauhan, and I am a 3D modeling and animation expert with over 15 years of experience in the field. I have a passion for creating visually stunning 3D models, animations, and graphics, and I'm excited to share my expertise with you. Whether you're a beginner or an experienced artist, I can help you improve your skills in 3D modeling, texturing, lighting, animation, rigging, CG graphics, and VFX. Let's work together to bring your creative ideas to life!

          Welcome to my website! My name is Anil Chauhan, and I am a 3D modeling and animation expert with over 15 years of experience in the field. I have always had a passion for creating visually stunning 3D models, animations, and graphics, and my work has been featured in a variety of industries including film, television, advertising, and video games.


          Throughout my career, I have had the opportunity to work on a wide range of projects, from small independent films to large-scale productions. This has given me a diverse set of skills and a deep understanding of the 3D animation process from start to finish. I have expertise in complete 3D modeling, texturing, lighting, animation, rigging, CG graphics, and VFX, and I'm always eager to take on new and exciting challenges.


          As a tutor, I am dedicated to sharing my knowledge and experience with aspiring artists and professionals alike. I believe that everyone has the potential to create amazing 3D models and animations, and I'm committed to helping my students achieve their goals. Whether you're a beginner looking to get started in the world of 3D animation, or an experienced artist looking to take your skills to the next level, I can provide personalized training and guidance to help you achieve your creative vision.

          View profile

          Comments (0)

          Search
          Popular categories
          Latest blogs
          Advanced Editing Techniques
          Advanced Editing Techniques
          After Effects offers a wide range of advanced editing techniques that can take your motion graphics, visual effects, and compositing skills to the next level. Here are some key techniques to explore:1. Advanced Masking & Rotoscoping Rotobrush 2.0: Quickly separate subjects from backgrounds. Refine Edge Tool: Helps with hair and fine details. Track Mattes & Alpha Mattes: Use shapes or text to mask specific areas. Content-Aware Fill: Removes objects and fills gaps intelligently. 2. Expressions & Scripting Wiggle Expression: wiggle(3,50) creates random motion. Time Expression: time*100 generates continuous movement. Looping Animation: loopOut("cycle") for seamless loops. Master Properties & Essential Graphics: Customize elements easily in Premiere Pro. 3. Advanced Motion Tracking Point Tracking: Attach elements to moving objects. Planar Tracking (Mocha AE): Used for screen replacements. 3D Camera Tracking: Integrate text/effects into real-world footage. Parallax Effects: Create depth using multiple layers. 4. 3D & Depth Techniques 3D Layer Controls: Rotate, scale, and position objects in a 3D space. Cameras & Depth of Field: Simulate cinematic depth. Parallax 3D Effect: Convert 2D images into depth-rich motion. Element 3D Plugin: Create and animate 3D objects. 5. Advanced Keying & Compositing Keylight Plugin: High-quality green screen removal. Spill Suppression: Reduce green/blue light reflections. Light Wrap Technique: Blend keyed elements with backgrounds. Shadow & Reflection Compositing: Enhance realism. 6. Time Manipulation Time Remapping: Speed ramping and slow-motion effects. Echo & Pixel Motion Blur: Create fluid, trailing effects. Frame Blending & Optical Flow: Smooth out speed changes. 7. Particle Effects & Simulations Particular Plugin (Trapcode Suite): Advanced particle systems. CC Particle World: Built-in alternative for particle effects. Newton Plugin: Adds real-world physics to animations. Liquify & Displacement Maps: Create organic distortions. 8. Color Grading & Visual Enhancements Lumetri Color Panel: Fine-tune exposure and color. Lookup Tables (LUTs): Apply professional color grades. Glow & Bloom Effects: Enhance light sources for realism. Chromatic Aberration: Mimic lens imperfections. 9. Procedural Animation & Effects Fractal Noise & Turbulent Displace: Generate natural textures. Audio Reactivity: Use audio amplitude to drive animations. Shape Layer Animations: Create complex motion graphics. 10. Advanced Transitions & Effects Shatter Effect: Simulate object breakage. Morphing Transitions: Seamless morphing between images. Camera Shake & Motion Blur: Add cinematic realism. Glitch & Distortion Effects: Create digital interference effects. Motion stabilization in After Effects is essential for fixing shaky footage and making it look smooth and professional. Here are different techniques to achieve motion stabilization:1. Warp Stabilizer (Easiest & Most Common)Steps: Import your shaky footage into After Effects. Select the clip in the timeline. Go to Effect > Distort > Warp Stabilizer. After the analysis is complete, adjust the settings: Result: "Smooth Motion" (retains some movement) or "No Motion" (completely stabilized). Smoothness: Increase for stronger stabilization (default is 50%). Method: Subspace Warp (Best for complex movement) Perspective (For slight perspective changes) Position, Scale, Rotation (For minimal correction) Position Only (Least invasive) If you see warping, switch Method to "Position, Scale, Rotation." Adjust Crop Less - Smooth More for better results. Pro Tip: If the footage becomes too zoomed-in, use "Stabilize Only" mode, then manually scale and reposition. 2. Manual Stabilization Using Motion TrackingFor more control, you can manually stabilize using the built-in motion tracking.Steps: Import your footage and open it in the Layer Panel. Go to Window > Tracker to open the tracker panel. Select your clip and click Track Motion. Choose Position Only (or add Rotation/Scale if needed). Place the tracking point on a high-contrast area that remains visible throughout the clip. Click Analyze Forward ▶ (let it process the movement). Once tracking is complete, create a Null Object (Layer > New > Null Object). Click Edit Target in the Tracker panel and select the Null Object. Click Apply (X and Y axis). Parent your footage to the Null Object (using the pick whip) to stabilize. Pro Tip: If needed, manually adjust keyframes to fine-tune stabilization. 3. Smoother Motion with ExpressionsFor subtle stabilization, you can use expressions to reduce jitter.Steps: Select your shaky footage. Press P to open Position properties. Hold Alt (Option on Mac) and click the stopwatch. Enter this expression: temp = wiggle(5,2); [temp[0], temp[1]] Adjust numbers for different levels of smoothness. 4. Using Mocha AE for Advanced StabilizationFor more control over specific areas: Open Effects & Presets > Mocha AE and apply it to your clip. Inside Mocha, track a stable feature in your scene. Export the tracking data and apply it to a Null Object. Parent your footage to the Null Object for stabilization. Which Method Should You Use? For quick fixes: Use Warp Stabilizer. For more control: Use manual tracking with a Null Object. For professional stabilization: Use Mocha AE. Motion Tracking in After EffectsMotion tracking allows you to track the movement of an object in a video and apply that movement to another element, such as text, graphics, or effects. After Effects provides different tracking methods depending on your needs.1. Single-Point Tracking (Basic)Used for tracking simple movement (e.g., a single object like a logo or eye movement).Steps: Import your footage and select it in the timeline. Go to Window > Tracker to open the Tracker Panel. Click Track Motion (this opens the Layer Panel). In the Tracker Controls, enable Position (for simple tracking). Place the tracking point on a high-contrast feature. Click Analyze Forward ▶ to track motion frame-by-frame. Create a Null Object (Layer > New > Null Object). Click Edit Target, select the Null Object, and press Apply (X and Y). Parent other elements (text, images) to the Null Object using the pick whip. ???? Best For: Attaching elements to moving objects (e.g., text following a moving car).2. Multi-Point Tracking (Position, Rotation, Scale)Used when an object rotates or changes size.Steps: Follow the steps from Single-Point Tracking, but enable Rotation and Scale in the Tracker Controls. Set two tracking points on opposite edges of the moving object. Apply tracking to a Null Object and attach elements to it. ???? Best For: Attaching graphics or effects to moving objects with depth.3. Planar Tracking (Mocha AE)Used for tracking flat surfaces (e.g., screens, signs, walls).Steps: Apply Mocha AE (Effect > BorisFX Mocha AE) to your footage. Open Mocha AE, select a planar surface, and draw a tracking shape. Click Track Forward ▶ to analyze movement. Export tracking data and apply it to a solid or adjustment layer. ???? Best For: Screen replacements, logo tracking on walls, object removal.4. 3D Camera Tracking (Advanced)Used for tracking objects in 3D space (e.g., placing 3D text in a scene).Steps: Select your footage and go to Effect > 3D Camera Tracker. After analysis, hover over the footage to see tracking points. Right-click a group of points and choose Create Null & Camera. Attach elements (text, graphics) to the Null Object. ???? Best For: Integrating text and objects into a real-world 3D scene.5. Motion Tracking with Expressions (Smooth Movement)You can use expressions to smooth out motion tracking. After tracking, go to the Position property of the target object. Alt+Click the stopwatch and enter: temp = wiggle(2,5); [temp[0], temp[1]] Adjust numbers for more/less movement. ???? Best For: Creating natural-looking movement in tracked elements.Which Tracking Method Should You Use? ✅ Basic Object Tracking → Single-Point Tracking ✅ Scaling & Rotating Objects → Multi-Point Tracking ✅ Screen/Logo Replacements → Mocha AE ✅ Adding 3D Text in a Scene → 3D Camera Tracker Face Tracking in After EffectsFace tracking in After Effects allows you to track facial features for effects like motion graphics, retouching, or facial replacements. There are two primary methods for face tracking:1️⃣ Face Tracking with After Effects (Built-in Face Tracker) 2️⃣ Face Tracking with Mocha AE (For More Advanced Control)1. Face Tracking with After Effects (Easy & Built-in)This method allows you to track facial features like eyes, nose, and mouth without plugins.Steps: Import Footage: Drag your video into the timeline. Open the Layer Panel: Double-click the footage to open it in the Layer Panel. Enable Face Tracking: Go to Window > Tracker to open the Tracker Panel. Select Face Tracking (Detailed Features) or Face Tracking (Outline Only). Start Tracking: Click Analyze Forward ▶ to begin tracking. After Tracking Completes: Right-click on the footage and choose Convert to Keyframes. This creates keyframes for facial movements. Attach Effects or Graphics: Create a Null Object and copy the keyframes to it. Parent other elements (e.g., glasses, effects) to the Null Object. ???? Best For: Applying face effects, color correction on specific areas, or motion-tracking masks.2. Face Tracking with Mocha AE (For Advanced Tracking & Face Replacement)Mocha AE provides more control and is ideal for advanced face tracking.Steps: Apply Mocha AE: Select your footage. Go to Effects & Presets > BorisFX Mocha AE and apply it. Open Mocha AE: Click "Track in Mocha" to open the Mocha interface. Create a Tracking Mask: Use the X-Spline or Bezier tool to draw around the face. Enable Shear & Perspective Tracking for accurate results. Track Forward ▶: Let Mocha track the face. Export Tracking Data: In Mocha, go to Export Tracking Data > After Effects Transform Data. Paste the data into a Null Object in After Effects. Attach Effects or Elements: Parent face effects, text, or graphics to the Null Object. ???? Best For: High-precision face tracking, face replacements, advanced VFX.3. Applying Effects to a Tracked FaceOnce you have a face tracked, you can: ✅ Add Motion Graphics (e.g., attach animated sunglasses, hats). ✅ Apply Retouching (e.g., smooth skin, lighten eyes). ✅ Face Replacement (e.g., swap a face with another actor). ✅ Blend Effects with the Face (e.g., fire effects, cyberpunk overlays). 3D Camera Tracker in After EffectsThe 3D Camera Tracker in After Effects analyzes video footage and creates a virtual 3D camera that matches the movement of the real-world camera. This allows you to place objects, text, and effects into a scene as if they were part of the original footage.Steps to Use the 3D Camera Tracker1. Prepare Your Footage Import your video and place it in the timeline. Ensure the clip has enough parallax movement (depth changes) for accurate tracking. 2. Apply the 3D Camera Tracker Select your footage in the timeline. Go to Effect > Track Camera. After Effects will analyze the footage (this may take time, depending on the resolution and length). Once completed, a series of colored tracking points will appear over the footage. 3. Create a 3D Null, Text, or Solid Hover over the tracking points. When they form a triangle, right-click and choose: Create Text and Camera (for adding 3D text) Create Solid and Camera (for placing a solid layer) Create Null and Camera (for attaching objects) A 3D Camera is automatically created in the timeline. Attach any graphics, 3D elements, or effects to the Null Object to match the camera movement. 4. Adjust the Scene Scale, rotate, or move the elements to fit naturally into the tracked scene. Use motion blur or depth of field for added realism. Tips for Better 3D Camera Tracking✅ Use High-Quality Footage – Avoid too much motion blur. ✅ Ensure Parallax Motion – The tracker needs foreground and background depth changes. ✅ Adjust Solve Method – If tracking fails, go to Advanced and change the Solve Method (e.g., "Tripod Pan" for static shots). ✅ Refine Tracking Points – Manually delete bad tracking points for better accuracy.Best Uses of the 3D Camera Tracker???? Adding 3D Text in a Scene ???? Attaching Objects to Moving Elements (e.g., labels on buildings) ???? Creating VFX Effects (e.g., explosions that match camera movement) ???? Replacing Billboards or Screens in Videos Would you like a step-by-step guide for a specific effect? ????

          7 Minutes Ago

          Introduction to Level Design Through Blocking in Unreal Engine
          Introduction to Level Design Through Blocking in Unreal Engine
          Introduction to Level Design Through Blocking in Unreal EngineBlocking is a fundamental step in level design that helps establish the layout, scale, and flow of a game environment before adding detailed assets. In Unreal Engine, blocking involves using simple geometric shapes (like cubes and cylinders) to prototype levels efficiently.Key Concepts Covered:✅ Understanding Blocking: Learn why blocking is essential for level design. ✅ Basic Tools & Workflow: Explore Unreal Engine's BSP (Binary Space Partitioning) and Geometry tools. ✅ Gameplay Flow & Composition: Arrange spaces for smooth player movement and engagement. ✅ Iterating & Refining: Quickly test and adjust level layouts before adding assets.Blocking allows designers to focus on gameplay first, ensuring a solid foundation before polishing the visuals. Ready to build your first level? ???????? Let me know if you need tags or a more detailed guide! ????In Unreal Engine, a pivot point is the reference point around which an object rotates and scales. By default, the pivot is located at the center or bottom of an object, depending on how it was imported or created. However, sometimes you may need to adjust the pivot for better control during manipulation.???? How to Change the Pivot in Unreal Engine Temporarily Move the Pivot Select the object in the viewport. Hold ALT + Middle Mouse Button (MMB) and drag to reposition the pivot. This change is temporary and resets when you deselect the object. Permanently Set a New Pivot Select the object. Press Right Click → Pivot → Set as Pivot Offset. This change remains even after deselecting the object. Reset the Pivot to Default Right-click the object. Select Pivot → Reset to return it to its original position. ???? Alternative Methods for Pivot Adjustment Use the Modeling Tools Editor (Unreal 5) If you have a static mesh, go to Modeling Mode and use the pivot tools. Modify the Pivot in a 3D Modeling Software (Blender, Maya, 3ds Max) If your asset was imported, adjust the pivot in your 3D software and re-import it. Would you like help with a specific pivot issue in Unreal? ????Creating simple block-out levels in game design using basic shapes and volumes is an essential technique known as grey-boxing or blocking out. This phase allows designers to quickly prototype levels to focus on layout, player flow, and scale before adding detailed assets. Here's how you can approach it:1. Plan the Layout: Start with a rough idea of the level's flow. Sketch a basic floor plan or use reference images to help with inspiration. Think about how the player will move through the level. Are there pathways, obstacles, or areas of interest? 2. Use Basic Shapes: Use simple cubes, rectangles, and spheres to represent walls, floors, platforms, and other basic elements. In Unreal Engine or other game engines, you can use Static Meshes (like boxes) or the Geometry Tools for faster creation. 3. Positioning and Scaling: Place your shapes in a way that represents the spatial layout. Don’t worry about fine details—focus on the overall flow. Ensure your player character can move easily through the space. Test the scale of objects by walking the player through the environment. 4. Player Flow: Consider how the player moves through the environment. Create natural pathways that lead to objectives or challenges. Use large blocking shapes to outline areas such as rooms, corridors, or open spaces that will later be filled with detailed assets. 5. Experiment with Elevation and Obstacles: Add simple ramps or steps to test verticality and player movement. Use volumes (like cylinders or cones) to represent barriers or interactive elements. 6. Test and Iterate: Regularly test the level in its current form. Does the player move through the space comfortably? Is there a good challenge progression? Make adjustments to shapes and layout to improve the level’s flow. 7. Add Game Logic: Once the basic shape and layout are done, you can start adding triggers, interactions, and simple collision boxes to simulate gameplay. This phase helps you visualize how the player will interact with the space and ensures that the design is functional before you commit time to creating more complex assets.Blocking, or grey-boxing, is a critical phase in the game design process. It allows designers to lay out a basic, functional structure for the game world without focusing on art or fine details. Here’s why it's so important:1. Faster Iteration: Quick Prototyping: Grey-boxing allows for rapid testing of level ideas and gameplay mechanics. It’s much faster to block out a level with simple shapes than to create detailed environments. Designers can iterate quickly based on playtests or feedback. Easy Changes: Since the design is made with basic shapes, it’s simple to make large-scale changes. You can rearrange areas, add new pathways, or resize structures without worrying about art assets. 2. Focus on Core Gameplay: Player Flow and Interaction: Grey-boxing helps you focus on the layout and flow of the level. You can test how the player navigates the environment, how obstacles interact with gameplay, and where critical elements, like objectives or enemies, should go. Identifying Issues Early: By blocking out the level early in the design process, you can identify problems such as bad player flow, confusing layouts, or unbalanced areas, before adding the complexity of detailed art assets. 3. Efficient Collaboration: Clear Communication: Grey-boxing provides a clear, tangible representation of the level for team members. Artists, programmers, and level designers can all see and discuss the same basic version of the level and can easily identify areas needing work. Cross-Discipline Feedback: It allows non-designers (e.g., programmers or artists) to give input, leading to more well-rounded feedback early in the design process. Artists can visualize the potential scale of areas, while programmers can begin to implement basic game mechanics. 4. Gameplay and Environment Balance: Visualizing Scale and Space: Grey-boxing ensures the scale of environments feels right for the player. It helps with things like perspective, distances between objects, and the general space of the environment. Testing Game Mechanics: It's easier to test things like jumping, movement, line-of-sight, and combat spaces in a grey-boxed level. You can adjust elements based on these tests before more complex systems are added. 5. Helps with Asset Planning: Identifying Asset Requirements: Once the level is blocked out, you’ll have a better idea of the types of art assets you’ll need—such as textures, models, or lighting setups—and can plan these resources effectively. Optimizing Workflow: By having a solid plan in place, the art and asset teams can focus on creating the necessary details only after confirming that the core design works. 6. Cost-Effective: Low-Cost Testing: Grey-boxing is a low-cost, low-risk phase that ensures the design is on the right track before committing significant resources to creating art, animations, and other high-cost elements. If the gameplay or level design isn’t working, it’s much cheaper to fix at this stage. In summary, grey-boxing helps prioritize functionality, gameplay, and layout over visuals early in the design process, making it an invaluable tool for creating solid, enjoyable game environments.Layout planning for player flow, environment scaling, and game design logic is an essential part of level design in game development. Here's how you can approach each aspect effectively:1. Player Flow: Goal: The player should be guided through the environment in a way that feels natural and intuitive, with clear progression from one area to the next. Pathways: Design the layout with logical paths that the player will follow. These paths should lead to important areas, objectives, or challenges. Make sure the player isn’t confused about where to go next. Linear Paths: For more straightforward games, you might have one primary path that the player follows from start to finish. Non-linear Paths: In open-world or exploration-based games, multiple pathways or hidden areas can encourage discovery and replayability. Landmarks: Use large, visually distinct objects or structures (e.g., towers, statues, or buildings) to serve as visual landmarks, helping players orient themselves within the environment. Obstacles & Challenges: Use obstacles or challenges to slow the player down or force them to engage with the environment. These can be physical (walls, pits), combat-related (enemies), or puzzles. Flow Control: Ensure that the flow isn’t too rushed or too slow. Adjust pacing by creating areas of tension (combat or tight spaces) followed by areas of relief (open spaces, exploration). 2. Environment Scaling: Size and Proportions: The environment must be scaled in a way that makes sense for both the player and the design of the game. Objects and spaces should feel appropriately sized in relation to the player character. For example, in a first-person game, doors should be large enough for the player to pass through comfortably. In platformers, jumps should be scaled to match the player’s movement abilities. Verticality: Consider how vertical space impacts the environment. Platforms, cliffs, and drop-offs can add depth to the level design, affecting both player movement and visual interest. Distance and Perspective: Scaling affects the sense of distance. If the player feels too far from important objectives, you might want to bring them closer or make them more visible to improve navigation and gameplay. Consistency: The scale of objects and spaces should remain consistent to avoid confusing the player. If one section of a level feels huge, while another feels cramped without reason, it could break immersion. Navigation Aids: To ensure players don’t feel lost, give them cues that help with scale and direction, such as using light sources, environmental changes, or sound effects. 3. Game Design Logic: Gameplay Goals: The layout and scaling of the environment should always support the core gameplay goals. For instance, in an action game, narrow hallways and open spaces may create opportunities for combat or stealth. In a puzzle game, the level might need to provide different layers of interaction and logic. Progression and Difficulty: Plan the layout so that the player experiences a gradual increase in difficulty. This can involve more complex puzzles, tougher enemies, or more intricate platforming as the player advances. Tutorial Areas: Early levels or areas should introduce basic mechanics and give the player time to understand them. As the game progresses, challenges can get more difficult, requiring the player to apply what they've learned in creative ways. Player Rewards and Exploration: Include areas that reward players for exploration. Hidden paths, collectibles, or Easter eggs can make the player feel like their effort is rewarded and encourage them to explore beyond the main path. Dynamic Interactions: If your game allows for interactions with the environment, think about how the player can use or change the environment. For example, destructible objects, movable platforms, or interactable switches that open doors or alter the environment’s layout. Pacing and Breaks: Design the environment to have areas of tension followed by moments of calm or relief. After an intense battle or difficult section, provide the player with a break to explore or collect items before the next challenge. Narrative Support: If your game has a story, the environment should reflect and support it. The setting can convey the tone, history, and context of the narrative, making the player feel more immersed in the world. Combining All Three Aspects:When you plan the layout of a level, these three elements—player flow, environment scaling, and game design logic—must work together harmoniously to create an enjoyable and functional experience. Here's a basic approach to integrate them: Start with Player Flow: Map out the path the player will take through the level, ensuring it feels intuitive and natural. Add Environment Scaling: Ensure the size and layout of the world are appropriate to the player and game type. Think about how different spaces will feel and how the player will experience them. Apply Game Design Logic: Layer in the gameplay mechanics, challenges, and narrative elements to make the environment not only functional but fun, immersive, and engaging. By thoughtfully planning these aspects, you can create levels that feel cohesive, balanced, and exciting for players.

          1 Day Ago

          Nuke, animating parameters
          Nuke, animating parameters
          In Nuke, animating parameters is a key aspect of creating dynamic visual effects. Here’s how you can animate parameters in Nuke:1. Setting Keyframes Select a Node: Click on the node you want to animate (e.g., Transform, Blur, etc.). Find the Parameter: Locate the parameter you want to animate (e.g., Translate, Scale, Rotate). Set a Keyframe: Right-click the parameter and choose "Set Key" OR Click the small diamond icon next to the parameter. Move to Another Frame: Change the frame number in the timeline. Modify the Value: Adjust the parameter; Nuke automatically creates a new keyframe. 2. Using the Curve Editor Open the Curve Editor (Shortcut: Shift + E). Select the animated parameter from the left panel. Adjust the Bezier handles to smooth or ease the animation. Right-click on keyframes for interpolation options like linear, constant, or cubic. 3. Using the Dope Sheet Open the Dope Sheet (Shortcut: Alt + D). This gives a visual timeline of keyframes. Drag keyframes to adjust timing. Right-click keyframes for options like copy, paste, delete. 4. Expressions for Automation Right-click the parameter and choose "Edit Expression". Use expressions like: frame → Moves based on the frame number. sin(frame) → Creates a wave-like motion. random(frame) → Generates random values. frame/10 → Slows down movement. 5. Linking Parameters (Expressions & Linking) Right-click a parameter → "Add Expression". Use parent.node.parameter to link values (e.g., Blur1.size = Transform1.scale * 10). 6. Using Motion Paths For movement-based animation (like object motion), use the Transform node. Adjust Translate X/Y over time to define a path. 7. Scripting for Advanced Animation Use Python or TCL scripts to automate animations. Example in Python: nuke.toNode("Transform1")["translate"].setAnimated() nuke.toNode("Transform1")["translate"].setValueAt(50, 1) # Frame 1 nuke.toNode("Transform1")["translate"].setValueAt(200, 50) # Frame 50 By mastering these animation techniques, you can create smooth and dynamic effects inside Nuke. Need help with a specific animation? ????

          1 Day Ago

          All blogs