Created by - Anil Chauhan
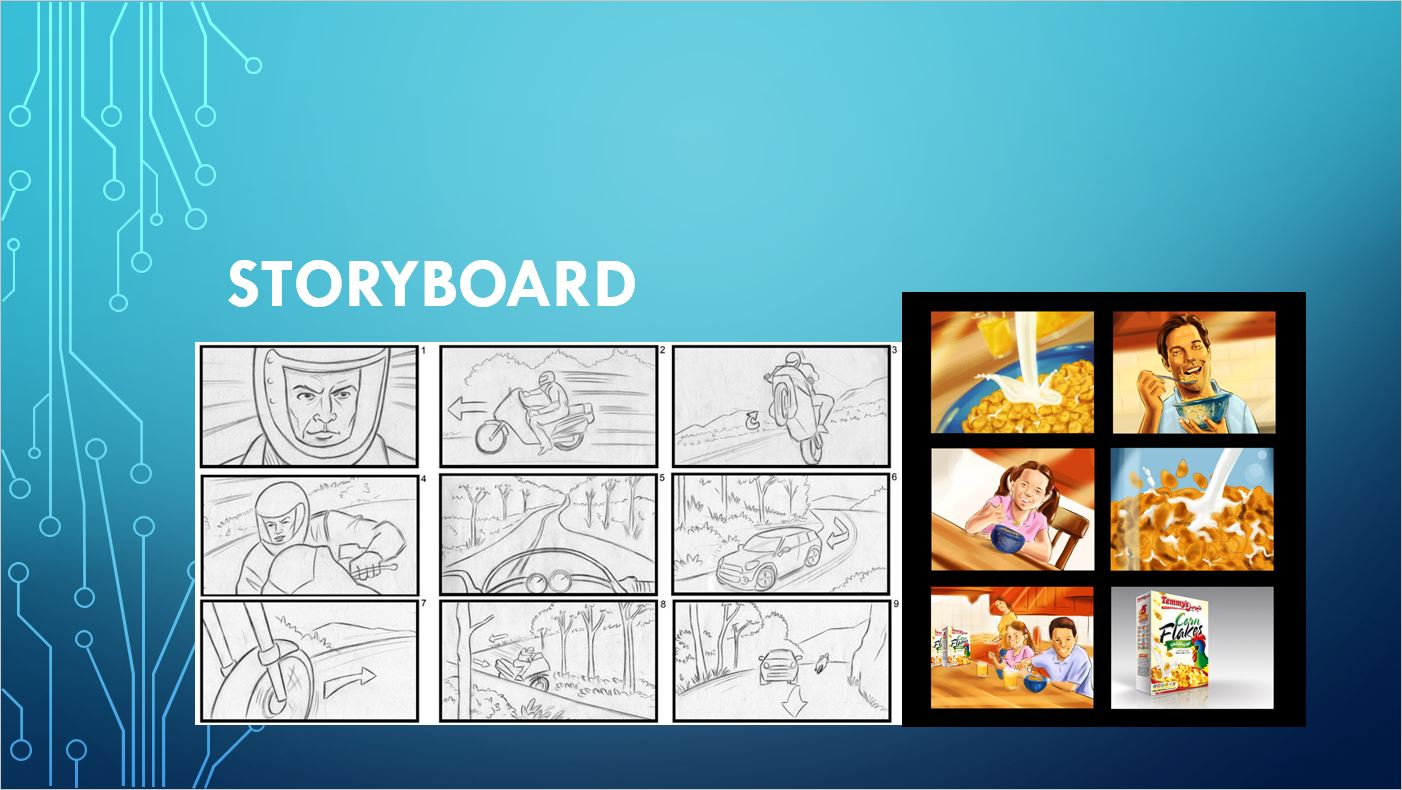
Story Board
A storyboard is a visual representation of a story, typically used in film, animation, video games, and other visual media to plan and visualize scenes before production. It serves as a blueprint for how a narrative will unfold, allowing creators to make important decisions about composition, camera angles, pacing, and more. A well-crafted storyboard provides a clear and efficient way to communicate the intended narrative and visual style to the entire production team. Here's how a storyboard is typically described:https://www.youtube.com/watch?v=TG_4n3ChFHA1. Visual Sequences: A storyboard is presented as a series of panels or frames, each representing a specific visual moment in the story. These panels can be hand-drawn or created digitally. Each panel often includes a sketched or illustrated scene that conveys the key elements of that moment.2. Shot Composition: Each panel not only depicts characters and objects but also shows the composition of the shot. This includes the placement of characters, the framing of the scene, camera angles, and any essential visual elements.3. Dialogue and Captions: Alongside or below each panel, there are often descriptions or captions that provide additional context. This can include dialogue, character actions, camera movements, and other relevant information.4. Pacing and Timing: Storyboards can also indicate the timing of scenes and transitions between shots. This is crucial for understanding the flow of the story and how individual shots fit together.5. Notes and Annotations: Storyboards may include notes or annotations to further clarify the director's or artist's vision. These notes can provide guidance on the mood, special effects, lighting, or any other important details.6. Story Elements: Each panel of a storyboard represents a part of the overall story. The panels collectively form a sequence that conveys the narrative's progression.7. Scene Transitions: Storyboards help plan how scenes transition from one to another. Whether it's a cut, a fade, a dissolve, or another type of transition, storyboards indicate how these will be executed.8. Collaboration Tool: Storyboards are a communication tool used by directors, cinematographers, animators, and other team members to ensure everyone is on the same page about how to bring the story to life visually.9. Pre-production Planning: Storyboards are created in the pre-production phase to guide the production team, from cinematographers to set designers, in understanding the director's vision for the project.10. Flexibility: Storyboards can be modified and adjusted as the project evolves. They provide a framework for the visual storytelling but are not set in stone, and changes can be made as needed.In summary, a storyboard is a visual roadmap for storytelling in visual media. It provides a detailed, frame-by-frame representation of a story's visual elements, shot compositions, pacing, and other crucial information, serving as a crucial planning tool for filmmakers, animators, and other creative professionals.
More detailsPublished - Thu, 12 Oct 2023
Created by - Anil Chauhan
Perspective | Types of Perspective
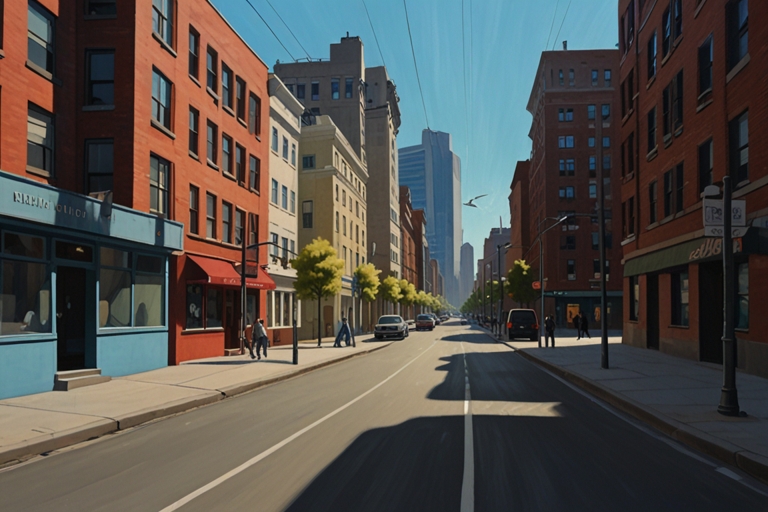
Perspective in art refers to the technique used to represent three-dimensional objects and scenes on a two-dimensional surface in a way that mimics how they appear in reality. It creates the illusion of depth and distance. There are several types of perspective, and the key ones are:Types of Perspective: Linear Perspective Linear perspective is a method of drawing objects on a flat surface to create the illusion of depth. The key principle is that parallel lines appear to converge as they recede into the distance, meeting at a single point called the vanishing point. There are three main types of linear perspective: One-Point Perspective: In this type, all parallel lines converge at a single vanishing point. This is typically used when looking straight at a flat surface, like a road or a railroad track receding into the distance. Example: Looking down a straight road, where the road and the lines of the sidewalk seem to come together at a point on the horizon. Two-Point Perspective: In two-point perspective, there are two vanishing points, typically located on the horizon line. This perspective is used for objects seen at an angle (not directly from the front or side). Example: Looking at a corner of a building, where the edges of the walls recede toward two different points on the horizon. Three-Point Perspective: This involves three vanishing points—two on the horizon line and one either above or below the object. It is often used for views that look up or down on a structure, creating an exaggerated sense of height or depth. Example: Looking up at a skyscraper from the street, where both the vertical lines of the building and the horizontal lines converge. Atmospheric Perspective (Aerial Perspective) This type of perspective is used to show the effect of the atmosphere on the appearance of objects viewed at a distance. Objects that are farther away appear lighter, bluer, and less distinct due to the particles in the air, such as dust, fog, and moisture. Example: In a landscape painting, distant mountains might appear faint and blue, while objects in the foreground are clearer and more colorful. Isometric Perspective Isometric perspective is a form of parallel projection where the dimensions of objects are kept constant without distortion. In this method, the angles between the axes are all equal (120°), and there is no convergence of lines. It's commonly used in technical drawings, architectural plans, and video games. Example: A 3D model of a building where all sides are shown at the same angle and size, without any parts seeming to recede into the distance. Curvilinear Perspective Curvilinear perspective uses curved lines instead of straight lines to create the illusion of depth. It is commonly seen in fisheye lens photography or certain kinds of digital art where the view distorts objects and lines into curves. Example: A wide-angle lens photograph where the edges of the scene appear distorted into curves, giving a sense of exaggerated depth. Tilted Perspective (Oblique Perspective) This perspective involves the use of tilted angles to show objects at a slight skew, typically used in technical or schematic drawings where a three-dimensional object is shown at an angle. It allows for showing the front and side of an object simultaneously. Example: A floor plan showing a room at a slight angle to show both the floor and the walls at once. How Perspective Works: Vanishing Point: The point at which parallel lines seem to converge as they recede into the distance. Horizon Line: The line that represents the viewer's eye level, where the sky meets the ground. In most perspectives, this is where the vanishing point(s) lie. Depth: Objects appear smaller as they get farther from the viewer, creating a sense of distance. Overlapping: Objects in the foreground overlap those in the background, which gives depth to the scene. Understanding perspective is essential for creating a realistic sense of space in both traditional and digital art. By manipulating vanishing points, horizon lines, and other visual cues, artists can guide the viewer’s eye and create dynamic, three-dimensional scenes on a flat canvas or screen.
More detailsPublished - Thu, 26 Dec 2024
Search
Popular categories
Adobe After Effects 2025
28Unreal Engine
14zbrush
10Maya Animation
8zbrush tutorial jewelry
7Maya 2025
5Latest blogs

Advanced Editing Techniques
45 Minutes Ago

Introduction to Level Design Through Blocking in Unreal Engine
1 Day Ago
Nuke, animating parameters
1 Day Ago
Write a public review