Created by - Shavikant Chauhan
Interpreting Footage in Adobe After Effects
Interpreting Footage in Adobe After Effects involves adjusting how After Effects processes imported files to match your project requirements. This step ensures that video, image sequences, and other assets behave correctly within your compositions. Here’s a comprehensive guide:What Is Interpreting Footage? Interpreting footage allows you to modify: Frame rate: Adjust how After Effects reads the frames per second (fps) of a file. Alpha channel: Define how transparency is handled. Color settings: Set color profiles for accurate rendering. Pixel aspect ratio: Fix distorted footage caused by mismatched aspect ratios. How to Interpret Footage Access the Interpret Footage Settings: Select the footage in the Project Panel. Right-click and choose Interpret Footage → Main, or press Ctrl+Alt+G (Windows) / Cmd+Option+G (Mac). Adjust Key Settings: Frame Rate: Set a custom frame rate if the default value doesn’t match your project settings. Useful for footage like slow-motion clips or image sequences. Alpha Channel: Choose how After Effects interprets transparency: Straight (Unmatted): Retains the original alpha channel without modifications. Premultiplied (Matted): Blends transparency with a background color. Fields and Pulldown: Deinterlace footage or remove pulldown patterns for smoother playback. Pixel Aspect Ratio: Correct aspect ratio issues (e.g., square vs. rectangular pixels). Color Profile: Assign a color profile to ensure the footage displays accurately in your composition. Apply Changes: Once you adjust the settings, click OK. The footage will now behave according to the new interpretation. When to Interpret Footage When the imported footage doesn’t match your project’s frame rate or resolution. To fix issues with alpha channels or color profiles in assets like logos or animations. When using image sequences, slow-motion footage, or archival videos with non-standard formats. Tips for Effective Interpretation Batch Interpretation: Select multiple assets in the Project Panel and interpret them simultaneously for efficiency. Match Project Settings: Ensure interpreted settings align with your composition's frame rate, color space, and resolution. Use Default Settings: If you frequently work with similar assets, set default interpretations in After Effects preferences. Tags for This TopicAfter Effects, interpreting footage, frame rate, alpha channel, pixel aspect ratio, color profile, deinterlacing, video editing, motion graphics, visual effects, image sequences, slow motion, Adobe Creative Cloud, asset management, footage settings, video production, After Effects workflow, transparency settings, pulldown removal. Would you like a step-by-step example for a specific footage type?
More detailsPublished - Mon, 20 Jan 2025
Created by - Shavikant Chauhan
Inroduction Unreal Engine
Unreal Engine (UE) is a powerful and widely-used real-time 3D creation tool developed by Epic Games. Originally designed for developing video games, Unreal Engine has grown into a versatile platform used in various industries, including gaming, film, architecture, automotive, simulation, and more. Below is an introduction to its core features and uses:Key Features:1. High-Quality Graphics: Unreal Engine is renowned for its cutting-edge rendering capabilities, delivering photorealistic visuals and immersive environments. It supports ray tracing, global illumination, and advanced shading techniques. 2. Blueprint Visual Scripting: UE offers a Blueprint Visual Scripting system, allowing users to create game logic without requiring extensive coding knowledge. It's an accessible way for beginners and artists to prototype and develop interactive features. 3. C++ Programming: For developers, UE provides full access to its source code, enabling custom functionality and optimizations using C++. 4. Cross-Platform Development: Unreal Engine supports multiple platforms, including PC, consoles (like Xbox and PlayStation), mobile devices, and even virtual/augmented reality (VR/AR) systems. 5. Unreal Editor: The central hub for creating content, the Unreal Editor, includes tools for level design, material creation, animation, and more. It features a user-friendly interface for developers and artists. 6. Marketplace: The Unreal Engine Marketplace offers a vast library of pre-built assets, plugins, and tools that can accelerate development. Many of these assets are free or affordably priced. Applications of Unreal Engine:1. Game Development: UE is a top choice for developing games ranging from indie projects to AAA titles. Examples include Fortnite, Gears of War, and Borderlands 3. 2. Film & Animation: Unreal Engine's real-time rendering capabilities are transforming the film industry. It’s used for virtual production, pre-visualization, and creating cinematic experiences. Shows like The Mandalorian leverage UE. 3. Architecture & Design: Architects and designers use UE to create interactive walkthroughs and stunning visualizations of buildings and environments. 4. Simulation & Training: Unreal Engine powers simulations for industries like automotive, healthcare, and military training, providing realistic environments and scenarios. 5. Virtual & Augmented Reality (VR/AR): UE offers robust tools for creating immersive VR/AR experiences, making it popular for both entertainment and professional applications. Getting Started with Unreal Engine: Download Unreal Engine: Visit the Unreal Engine website to download the latest version through the Epic Games Launcher. Explore Tutorials: Epic Games provides comprehensive tutorials and learning resources, including the Unreal Engine Documentation and free courses on platforms like the Unreal Online Learning portal. Experiment with Templates: UE comes with pre-built templates for various game genres, such as first-person shooters, side-scrollers, and VR. Join the Community: The Unreal Engine community is vibrant and supportive. Participate in forums, Discord channels, or events like Unreal Fest to connect with other developers. Unreal Engine’s versatility, ease of use, and robust tools make it a go-to platform for creators across many fields. Whether you're a beginner or an experienced developer, UE offers tools to bring your ideas to life.
More detailsPublished - Mon, 20 Jan 2025
Created by - Shavikant Chauhan
animation |Curve Editor | Customize the Interface
"nuke" animationCreating a "nuke" animation typically involves simulating an explosion with a nuclear-like aesthetic. The parameters you need depend on the software you're using (e.g., Blender, Maya, After Effects, Houdini). Below is a general breakdown of key parameters to consider:1. General Animation Settings Timeline/Duration: Set the total length of your animation (e.g., 10–20 seconds for a full explosion). Frame Rate: Standard rates are 24, 30, or 60 FPS for smoother animations. 2. Simulation Parametersa. Explosion Shape Blast Radius: Controls the size of the explosion. Blast Shape: Adjust to create a mushroom cloud with a distinct stalk and cap. Falloff: Determines how the intensity decreases with distance. b. Smoke & Fire Density: Controls the thickness of the smoke. Turbulence: Adds chaotic movement to smoke and fire. Velocity: Determines the speed of expansion. Heat/Temperature: Affects fire intensity and dissipation. Color Mapping: Controls gradients (e.g., bright white to orange to black). c. Particles/Debris Emission Rate: Number of particles per frame. Size Variation: Randomize particle sizes for realism. Gravity/Drag: Affects how particles fall and settle. Lifetime: How long particles are visible before fading out. 3. Lighting Key Light: Represents the explosion’s initial flash. Area Light: Illuminates the surrounding environment. Falloff: How light intensity decreases over distance. Color: Typically starts as bright white, transitions to orange/yellow. 4. Shader/Material Parameters Emission Strength: Intensity of the glowing areas (fireball, sparks). Transparency: Use alpha maps for smoke fading. Noise/Detail: Add procedural textures to enhance realism. Reflection/Refraction: Simulate light interactions with nearby objects. 5. Camera Settings Field of View (FOV): Adjust for cinematic framing. Shake: Simulate a shockwave effect. Depth of Field (DOF): Blur distant or close elements for focus. 6. Post-Processing Glow/Bloom: Adds a radiant effect to the explosion. Lens Flare: Simulate the light burst. Motion Blur: Makes fast-moving elements smoother. Color Grading: Adjust contrast, saturation, and hues. Software-Specific FeaturesBlender Use the Mantaflow simulation engine for smoke/fire. Enable Cycles Renderer for realistic lighting. Use Volume Shaders for detailed smoke. Houdini Use Pyro FX for advanced fluid dynamics. Fine-tune the density, temperature, and fuel attributes. After Effects Use Trapcode Particular or Element 3D for particles. Add Optical Flares for light effects. What software are you using? I can provide more tailored guidance if needed!Curve EditorThe Curve Editor in Nuke is a powerful tool for animating and fine-tuning the timing and motion of keyframes. It allows you to control how parameters change over time, providing a detailed and precise interface for creating smooth and dynamic animations.Accessing the Curve Editor Open your Node Graph. Select the node whose parameters you want to animate. Open the Curve Editor from the menu: View > Curve Editor or press Shift + E (default shortcut). Key Features of the Curve Editor1. Parameter List Located on the left, it shows all animatable properties of the selected node (e.g., Translate, Scale, Opacity). Click the checkboxes next to parameters to view/edit their curves in the timeline. 2. Timeline Horizontal axis: Represents time (frames or seconds). Vertical axis: Represents the parameter's value. Scrub through the timeline to see changes in real-time. 3. Keyframes Represented as dots along the curve. You can: Add Keyframes: Alt/Option + Click on the curve. Delete Keyframes: Select and press Delete. Move Keyframes: Drag to adjust timing or value. 4. Curve Types Linear: Creates straight transitions between keyframes. Bezier: Allows smooth, adjustable curves for ease-in/out. Constant: Maintains a static value until the next keyframe. 5. Spline Handles Appear when using Bezier curves. Drag handles to adjust the curve's shape and smoothness. Common Use Cases Animating Transformations: Use the Transform node's curves (Translate X/Y, Rotate, Scale) to animate movement or zoom effects. Opacity Fades: Animate the Opacity parameter of a node for fade-ins/outs. Color Grading Over Time: Adjust parameters like Gain or Gamma to change brightness or contrast dynamically. Advanced Tools Expression Links: Link parameters using expressions for dynamic, procedural animations. Example: Link a rotation to time for a spinning effect (frame * 10). Time Warping: Use the TimeWarp node to manipulate the curve and adjust playback speed. Predefined Easing: Apply easing options to control the acceleration and deceleration of animations. Tips for Using the Curve Editor Zoom & Pan: Use the mouse wheel to zoom and Alt + Drag to pan. Fit to View: Right-click in the curve editor and choose Fit to View to display all keyframes. Snap to Frames: Enable snapping to ensure keyframes align with whole frames. Scripting: Use Python or TCL scripts to programmatically set keyframes. Let me know if you’d like guidance on a specific animation setup in the Curve Editor!nuke customizing the interfaceCustomizing the interface in Nuke allows you to tailor the workspace to your workflow. Nuke offers flexible options for rearranging panels, creating custom layouts, and modifying settings to suit your preferences.Ways to Customize the Interface1. Rearranging Panels Docking Panels: Drag panels (e.g., Viewer, Node Graph, Properties) to different areas of the interface. You'll see highlights showing where the panel will dock. Floating Panels: Undock panels by dragging them out of the main window to create standalone, floating panels. Combining Panels: Drag one panel onto another to combine them as tabs. 2. Custom Layouts Saving Layouts: Arrange the interface as desired. Go to Workspace > Save Layout. Name the layout and save it for future use. Loading Layouts: Access your saved layouts from Workspace > Custom Layouts. 3. Customizing Menus and Toolbars Adding Shortcuts: Open the Preferences panel (Edit > Preferences). Go to the Panels > Custom Shortcuts section. Assign custom shortcuts to frequently used commands. Custom Toolbar: Right-click in the toolbar area and select Manage Toolbars. Add, remove, or rearrange tools to streamline your workflow. 4. Python Scripts for Customization Use Python scripts to add custom functionality to menus or panels. Creating a Custom Menu: Add a .py file to the .nuke directory. Example: import nuke def my_custom_function(): nuke.message("Hello, Nuke!") nuke.menu('Nuke').addCommand('Custom/My Function', my_custom_function) This adds a menu item under Custom > My Function that triggers the script. 5. Custom Node Graph Settings Node Appearance: Change the appearance of nodes in the Node Graph via Preferences > Node Graph. Customize node shapes, colors, and sizes. Backdrop Nodes: Organize groups of nodes with backdrop nodes for better clarity. Add a custom label, color, or size to backdrops. 6. Adjusting Viewer Settings Customize the Viewer panel to suit your needs: Viewer Color Settings: Adjust LUTs (Look-Up Tables) for color grading. Viewer Controls: Rearrange overlays like grid lines or safe areas. 7. Setting Default Preferences Default Nodes: Set default values for nodes by editing the init.py file in the .nuke directory. Example: To set default values for a Blur node: nuke.knobDefault('Blur.size', '10') Startup Layout: Save your preferred layout and set it as the default when Nuke starts (Workspace > Set as Default). Restoring DefaultsIf the customization becomes overwhelming or you want to reset everything: Go to Workspace > Reset to Default. Delete the .nuke directory (back it up first if needed) to remove all customizations. Let me know if you’d like help with specific customizations or scripting!
More detailsPublished - Tue, 21 Jan 2025
Created by - Shavikant Chauhan
alphas in Adobe Substance
Using alphas in Adobe Substance tools (like Substance Painter) is a powerful way to create intricate details, textures, and effects. Here’s a step-by-step guide on how to use alphas effectively:What Are Alphas?Alphas are black-and-white textures or images used as masks or stamps. The white areas represent the highest intensity (or opacity), and the black areas represent zero intensity (or transparency).Using Alphas in Substance Painter1. Add an Alpha to a Brush Choose a Tool: Select a painting tool (e.g., Paint, Eraser, or Projection). Open the Alphas Panel: In the Properties panel, locate the Alpha slot. Select an Alpha: Drag an alpha from the Assets panel or import your own (drag and drop or use File > Import Resources). Adjust Brush Settings: Customize the brush size, flow, or hardness in the Brush Properties to match the desired effect. 2. Stamping Details After selecting the alpha, click or drag on the 3D model to stamp the alpha pattern directly onto the surface. Use the projection tool for more precise placement if necessary.https://www.youtube.com/watch?v=7dFP1wQz-Cw&list=PLIi3DnFfUZQGK6XqOxyiKJt74TBAjepN3 3. Using Alphas with Height Maps Add a Layer: Create a new layer and set its material properties to include height. Apply the Alpha: Use an alpha to define the shape of the height details. Adjust Depth: Modify the height slider to control the intensity of the effect.https://www.youtube.com/watch?v=SjVV12Z6XmU 4. Masks with Alphas Add a mask to a layer by right-clicking it and selecting Add Black/White Mask. Select an alpha and paint on the mask to reveal or hide specific areas. 5. Fine-Tuning the Alpha Rotate or Scale: Use the alpha-specific sliders in the brush settings to change the rotation, scale, or tiling. Blending Modes: Experiment with blending modes in the layer stack to combine alpha effects with other materials.https://www.youtube.com/watch?v=ARH2U_Al5ZI Using Custom Alphas Create or Download: Make an alpha in Photoshop or download it from online resources. Import Alphas: Go to File > Import Resources. Select Alpha as the resource type and add it to the project or library. Apply: Use the imported alpha like any other in Substance Painter.https://www.youtube.com/watch?v=7dFP1wQz-Cw&list=PLIi3DnFfUZQGK6XqOxyiKJt74TBAjepN3 Tips for Best Results Resolution: Use high-resolution alphas for sharp details. Combine Effects: Mix alphas with other tools like normal maps or roughness for more complex materials. Experiment: Try layering multiple alphas on different layers to create unique patterns. Brush Dynamics: Enable pressure sensitivity for more natural results (if using a tablet). Let me know if you need more details or help with a specific alpha-related workflow!
More detailsPublished - Tue, 21 Jan 2025
Created by - Shavikant Chauhan
Unreal Interface
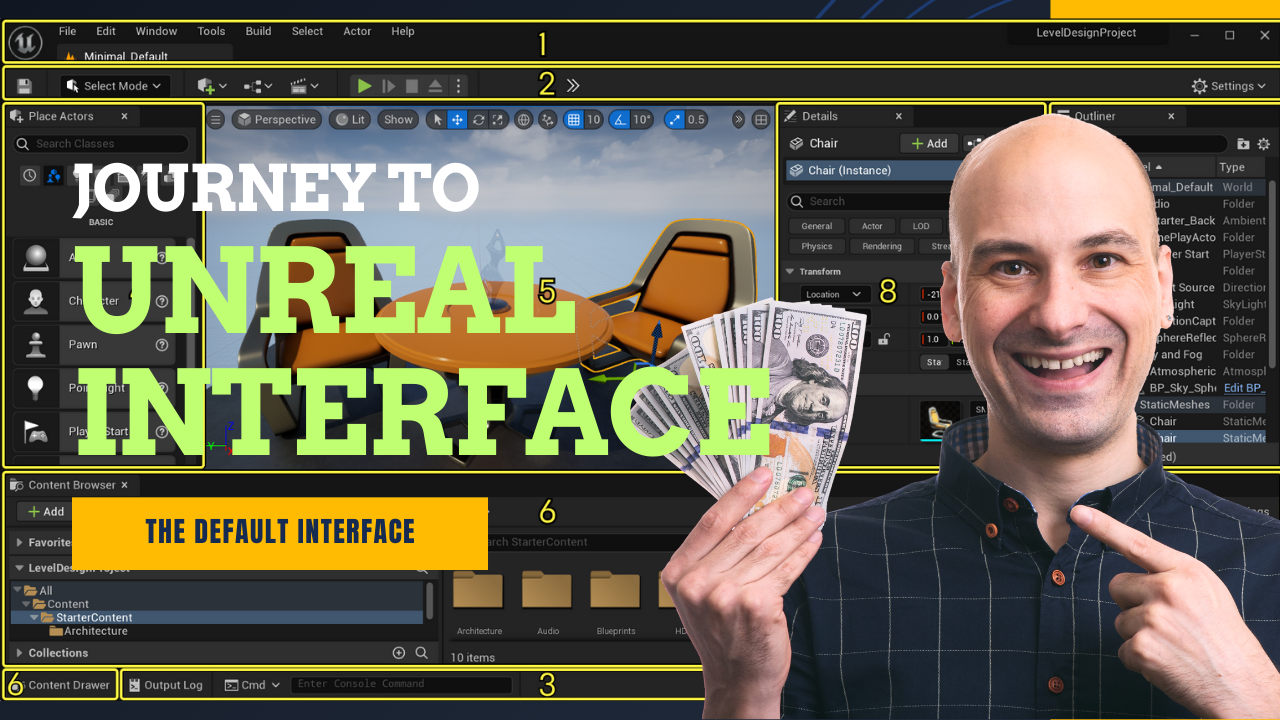
Tab Bar and Menu BarToolbarButtom ToolbarPlace Actor / ModesViewportsContent Browser / Content DrawerOutlinerDetailsIn Unreal Engine, the Tab Bar, Menu Bar, and various panels like Toolbar, Content Browser, and Outliner provide the primary interface components for interacting with the editor and managing your game or project. Below is a breakdown of each component you mentioned, explaining their purpose and function within the Unreal Engine user interface:1. Tab Bar and Menu Bar Tab Bar: Located at the top of the editor window, the Tab Bar is used to organize and switch between different open tabs or panels (e.g., the Content Browser, Blueprint Editor, Level Editor, Outliner, and more). It helps you quickly navigate between different tools and views in Unreal Engine. Menu Bar: Positioned directly above the Tab Bar, the Menu Bar provides access to the core editor functions. It includes menus for File, Edit, Window, Help, and more. From here, you can manage projects, settings, preferences, and invoke various editor features. 2. ToolbarThe Toolbar is typically located just below the Menu Bar and offers quick access to frequently used editor actions. Common tools in the Toolbar include: Play / Simulate buttons for testing your game. Save options. Build tools for compiling and baking. Viewport Navigation tools for adjusting how you view the 3D environment (e.g., moving around the scene, toggling grid visibility). Quick Add buttons for creating new assets like actors, blueprints, materials, and more. 3. Button ToolbarThe Button Toolbar is a streamlined version of the Toolbar, often consisting of just the most essential tools you need to interact with the editor. This toolbar is generally used for quick actions like: Transform tools (move, rotate, scale) for manipulating actors in the scene. Snapping controls for grid and rotation snapping, allowing precise placement of objects. Viewport camera controls, like selecting camera modes or focusing on the active camera. 4. Place Actor / Modes PanelThe Place Actor panel (sometimes called the Modes Panel) is a sidebar that allows you to quickly drag and drop actors, assets, and components into the scene. It’s typically divided into several categories: Place Actors: Includes common actor types like meshes, lights, cameras, volumes, and more. Painting Tools: Options for adding things like foliage or landscape brushes. Landscape: Tools for creating and editing terrains. Geometry: Adding and manipulating basic geometry (e.g., cubes, spheres). Modes: Allows switching between editing modes like Landscape Mode, Foliage Mode, Painting Mode, etc. 5. ViewportsViewports are the windows where you can see and interact with the 3D environment in Unreal Engine. You can have multiple viewports open, each showing different perspectives of the level. Each viewport has the following functionality: Perspective View: The default 3D view of your scene. Orthographic Views: Top, front, left, right, etc., for precise placement and editing. Camera View: When in play mode, the viewport can display the view from the player's camera. Viewport Navigation: Tools for panning, zooming, and rotating the scene to view from different angles. 6. Content Browser / Content DrawerThe Content Browser is a panel where all the assets (textures, models, materials, blueprints, animations, etc.) used in your project are stored and managed. This is where you: Search for and organize assets. Import new assets into the project. Create new folders or assets (e.g., materials, blueprints). Preview assets by clicking on them. The Content Drawer is similar to the Content Browser, but it can be docked to the bottom of the screen, allowing it to remain visible while you work in other parts of the editor.7. OutlinerThe Outliner is a hierarchical view of all the actors (objects) currently in your scene. It provides a structured list of all objects in the level, making it easy to: Select and organize actors. Group actors together into folders for easier navigation. Hide or show specific objects in the scene without deleting them. Search for specific actors in a complex level. 8. Details PanelThe Details Panel displays the properties of the currently selected actor or object in the scene. For example, if you select a mesh, the Details Panel will show options for transforming, scaling, and modifying the mesh’s properties (materials, collisions, etc.). Key functions of the Details Panel include: Adjusting properties: Change values like position, rotation, scale, and custom settings of the selected actor. Component details: View and adjust properties of components attached to the selected actor (e.g., a camera, light, or mesh). Adding components: Add new components to an actor directly from the Details Panel. 9. Tab Bar (Recap)The Tab Bar, as mentioned earlier, is where you can see and switch between different editor panels (like Outliner, Content Browser, Blueprint Editor, etc.). It helps organize your workspace and keeps your active panels easily accessible.SummaryIn Unreal Engine, the Tab Bar, Toolbar, Content Browser, Outliner, Details Panel, and other UI components form the backbone of your development environment. They help manage the flow of your project, whether you're placing actors, adjusting settings, working with assets, or navigating through the scene. Mastering the Unreal Engine interface helps improve workflow efficiency and makes game development more intuitive. If you'd like more detailed guidance on any specific panel or function, feel free to ask!
More detailsPublished - Tue, 21 Jan 2025
Created by - Shavikant Chauhan
after effect - Details of files
Adobe After Effects supports various file types and organizes them for different purposes, such as importing, exporting, and working within compositions. Below is an overview of the main file categories and their details:1. Project Files (.aep, .aet) File Types: .aep (project file), .aet (template file) Purpose: Stores the entire After Effects project, including compositions, layers, settings, and references to imported assets. Characteristics: Does not store imported media (only links to them). Cross-platform compatibility (Mac and Windows). 2. Composition Files A composition is a container where you combine and animate various layers. Key Components: Timeline: Where you manage layers and keyframes. Layers: Imported files (videos, images, text, etc.) or created elements. Effects: Applied to layers for animation, transitions, and visual effects. 3. Imported Files Supported File Types: Video: .mp4, .mov, .avi, .wmv, .mkv, etc. Audio: .mp3, .wav, .aac, .aiff. Image: .jpeg, .png, .gif, .tiff, .psd (Photoshop), .ai (Illustrator). 3D Files: .obj, .c4d (Cinema 4D integration). Behaviors: Files are linked to the project; moving or deleting the original files will break links. Can be imported as individual assets or as image sequences. 4. Exported Files Video: Usually exported through the Render Queue or Adobe Media Encoder. File Formats: .mp4 (H.264), .mov (QuickTime), .avi, etc. Codecs: H.264, ProRes, DNxHR, etc. Image Sequences: Exported as .png, .jpeg, .tiff, etc. Other Formats: .gif, .json (for Lottie animations). 5. Cache and Temporary Files Purpose: Speeds up playback and rendering by storing previews and processed frames. File Locations: Disk Cache: Located in preferences; files are stored on a specified drive. Memory Cache: Stored in RAM during active sessions. 6. Script and Plugin Files Scripts: .jsx, .jsxbin (ExtendScript files to automate tasks). Plugins: .aex or third-party plugins for advanced effects and utilities. 7. Settings and Templates Preferences Files: Custom settings for the workspace, shortcuts, and configurations. Templates: Custom compositions or animations saved as .aet. Would you like details on a specific type of file or workflow in After Effects?
More detailsPublished - Wed, 22 Jan 2025
Created by - Shavikant Chauhan
The Switches and Column
In Adobe After Effects, the Switches and Columns section of the Timeline Panel provides controls and options for layers within a composition. Here's a detailed breakdown:Key Switches in After EffectsThese are located in the Switches column of the Timeline Panel. Visibility (Eye Icon) Toggles the visibility of the layer in the composition. Shortcut: Ctrl + Shift + H (Windows) or Cmd + Shift + H (Mac) to toggle all. Audio (Speaker Icon) Toggles the audio for the layer. If audio is present in a layer, it enables or disables playback. Solo (Dot Icon) Ensures only the selected layer(s) are visible and audible. Useful for focusing on specific elements. Lock (Padlock Icon) Prevents the layer from being moved, edited, or modified accidentally. Shy (Face Icon) Hides the layer from the timeline when the "Shy Layers" switch is enabled (near the top of the Timeline Panel). Collapse Transformations / Continuously Rasterize (Sun Icon) For vector layers (e.g., .AI files): Maintains sharp edges when scaling. For pre-compositions: Enables transformations from nested compositions to be applied in the parent composition. Adjustment Layer Turns the layer into an adjustment layer, where effects applied will impact all layers beneath it in the stack. Motion Blur (Shutter Icon) Enables motion blur for the layer. Requires the "Enable Motion Blur" switch at the top of the Timeline Panel to be toggled. Frame Blending Smoothens playback by blending frames when changing frame rates or time remapping. 3D Layer (Cube Icon) Converts the layer into a 3D layer, enabling 3D transformations like rotation, depth, and perspective. Environment Layer Makes the layer act as an environment map for 3D layers. Timeline ColumnsColumns can be customized to show various information and options. Common ones include: Layer Name Displays the name of the layer (e.g., imported file names or custom names). Source Name Shows the original source file's name for imported assets. Parent & Link Allows layers to be parented to other layers, linking their transformations. In/Out Points Shows the start (In) and end (Out) points of the layer in the timeline. Stretch Displays and allows the adjustment of layer duration and speed. Blend Modes Shows and modifies the blending mode (e.g., Multiply, Screen, Overlay). Track Matte Assigns a layer to be used as a matte (e.g., Alpha Matte, Luma Matte). Labels Color labels for easier organization and grouping. Customizing Columns Add/Remove Columns: Right-click on any column header and choose which columns to display. Rearrange Columns: Drag column headers to rearrange their order.
More detailsPublished - Wed, 22 Jan 2025
Created by - Shavikant Chauhan
Working on Digital Assets
Adobe After Effects is widely used for creating animations, visual effects, and compositing digital assets. Here's an overview of how After Effects works with digital assets:Types of Digital Assets in After Effects Video Files: Formats: .mp4, .mov, .avi, .mkv, etc. Purpose: Base footage for editing, adding effects, or compositing. Image Files: Formats: .jpeg, .png, .gif, .tiff. Purpose: Backgrounds, overlays, or elements in compositions. Supports transparency (e.g., .png files). Vector Files: Formats: .ai (Adobe Illustrator), .svg. Purpose: Scalable graphics without quality loss. Use "Continuously Rasterize" for crisp scaling. Audio Files: Formats: .mp3, .wav, .aac. Purpose: Background music, sound effects, or voiceovers. 3D Assets: Formats: .obj, .c4d (Cinema 4D files). Purpose: Incorporate 3D models or environments into a project. Text and Shape Layers: Created directly in After Effects for custom titles, typography animations, or graphic elements. Workflow for Using Digital Assets Importing Assets: Drag-and-drop files into the Project Panel or use File > Import. Organize assets into folders for better management. Adding Assets to Composition: Drag assets from the Project Panel into the Timeline Panel or directly into the Composition Viewer. Layer-Based Editing: Each asset becomes a layer in the timeline. Layers can be reordered, resized, or animated independently. Applying Effects: Use the Effects & Presets panel to add visual or audio effects to assets. Keyframing & Animation: Add keyframes to properties like position, scale, opacity, or rotation for animation. Compositing: Combine multiple assets into a seamless composition using tools like masks, track mattes, and blend modes. Exporting: Export the final composition through the Render Queue or Adobe Media Encoder. Best Practices When Working with Digital Assets Organize Files: Use descriptive names and folders in both your system and the After Effects project. Use Linked Files: After Effects references assets from their original location; avoid moving or renaming files after importing. Optimize Performance: Pre-compose layers and use proxies for heavy assets. Clear the cache to maintain smooth performance. Work Non-Destructively: Use adjustment layers and effects that can be modified without altering the original asset.
More detailsPublished - Wed, 22 Jan 2025
Created by - Shavikant Chauhan
Arranging And Managing Layers
In Adobe After Effects, arranging and managing layers is crucial for creating organized, efficient, and visually cohesive compositions. Here’s an overview:Arranging Layers Layer Order: Layers are stacked in the Timeline Panel, and the order determines their visual appearance in the composition. Top layers appear in front of lower layers. Reordering Layers: Drag layers up or down in the Timeline Panel to change their stacking order. Align and Distribute: Use the Align Panel to position layers accurately relative to each other or the composition. The Distribute options evenly space multiple layers. Parenting Layers: Use the Parent & Link column to connect layers so that transformations (e.g., position, scale) on the parent layer affect the child layers. Grouping Layers (Pre-composing): Select multiple layers and pre-compose them (Ctrl + Shift + C or Cmd + Shift + C). Combines them into a single composition for cleaner organization. Managing Layers Renaming Layers: Rename layers for clarity by pressing Enter (Windows) or Return (Mac). Color Coding: Assign colors to layers using the Label column to group and differentiate them. Locking Layers: Lock layers (padlock icon) to prevent accidental edits. Shy Layers: Mark layers as shy (face icon) and toggle the "Shy Layers" switch to hide them in the timeline while keeping them in the composition. Solo and Mute Layers: Use the Solo (dot icon) to isolate layers for focused editing. Use the Mute/Hide Audio (speaker icon) to disable sound for specific layers. Layer Shortcuts Transform Properties: P: Position S: Scale R: Rotation T: Opacity A: Anchor Point Toggle Visibility: Ctrl + Shift + H (Windows) or Cmd + Shift + H (Mac). Duplicating Layers: Ctrl + D (Windows) or Cmd + D (Mac). Trimming Layers: Alt + [ or Alt + ] (Windows) / Option + [ or Option + ] (Mac) to adjust in/out points. Best Practices Organize Layers: Use descriptive names and group related layers in folders. Minimize Clutter: Use shy layers and pre-compositions for complex projects. Stay Consistent: Use consistent color codes and naming conventions.
More detailsPublished - Wed, 22 Jan 2025
Search
Popular categories
Adobe After Effects 2025
30Unreal Engine
15zbrush
10Light
10Maya Animation
8zbrush tutorial jewelry
7Latest blogs
Introduction to Arnold in Maya
Mon, 24 Feb 2025
Substance to Maya Workflow
Sat, 22 Feb 2025
ZBrush User Interface Overview
Fri, 21 Feb 2025
Write a public review